Adobe Lightroom Version Based Catalog Scan for Duplicate Pictures
Raza Ali Kazmi
Adobe Lightroom, which comes as a part of the Creative Cloud family is an image organization and manipulation tool. Despite being an organization tool itself, Lightroom often troubles users as its catalogs keep getting messier with each edit made to images.
One of the ways to keep Lightroom catalogs organized is to get rid of all duplicate or similar photos. It is likely that you no longer need most of them anyway. Doing so will not just help you recover lost storage space but will also enhance Lightroom’s speed and performance on your computer. What else could you want after all?
Manually going through all versions of images in your Lightroom catalogs and deleting duplicate or similar files sounds like a monotonous task. The neat point is that you don’t have to do it manually. PictureEcho is an intelligent tool that can automatically scan your Lightroom catalog and hunt for all duplicate or similar files for you. Using PictureEcho requires absolutely no prior technical knowledge and that is honestly the best part of this tool.
Scanning Lightroom Catalogs with PictureEcho
1. Installation
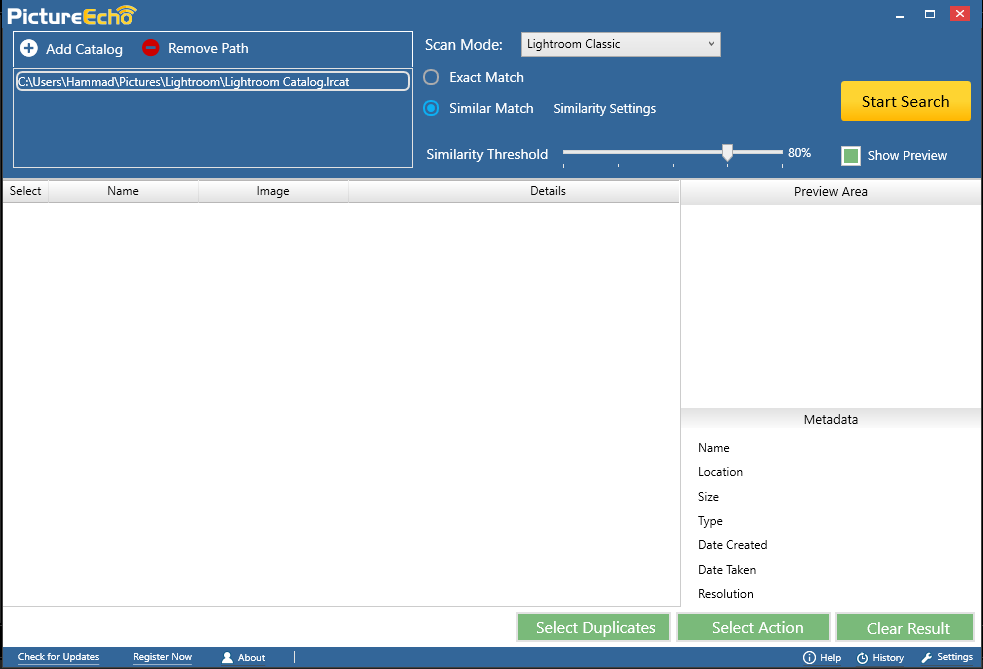
First of all, head to PictureEcho’s website to download the setup file and perform the installation. The setup process generally only takes a few seconds. Once the application is installed and launched, it looks like this:
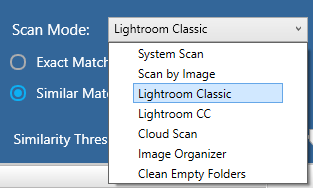
2. Set Scan Mode
The default Scan Mode is System Scan. In this case, you should select Lightroom Classic from the dropdown menu.
3. Add Catalog
Click on the Add Catalog button towards the top-left corner of your screen and load the catalog you wish to scan.
4. Set Criteria
PictureEcho allows users to look for both exact matches as well as similar matches. While making edits to an image, each edit is stored in the catalog. This generates several unnecessary similar images. Hence, in this case, you should select the Similar Match option. A Similarity Threshold can also be set.
5. Start Search
Once you are done with all the settings, you can click on the Start Search button. Depending on the size of your catalog, this might take a while. As soon as the scan is over, you will be able to see details regarding the detected duplicates/ similar images.
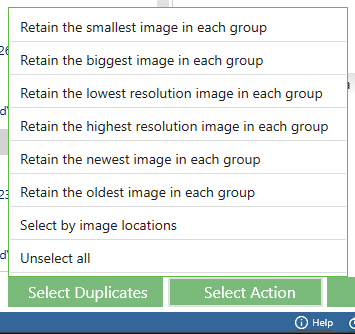
6. Select Duplicates
Now it is time to decide which duplicates you wish to retain and which ones you’re ready to let go of. You can either manually go through all the files and select duplicates or you can use the Select Duplicates option. By opting for the latter, you will be able to automatically select duplicates based on any of the following criteria:
- The smallest image in each group
- The largest image in each group
- The lowest resolution image in each group
- The highest resolution image in each group
- The newest image in each group
- The oldest image in each group
- Image Location
Making use of the Select Duplicates feature is obviously the smarter thing to do here. If you want to make a version-based selection, you can opt for the newest/ oldest image options.
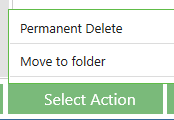
7. Select Action
Once you have selected the duplicates, click on the Select Action button. Finally, you can either move the selected duplicates to another location or delete them permanently.
That’s all folks! It’s even easier than it sounds. Within a few minutes, you can manage to get rid of several junk files accumulated in your catalog.
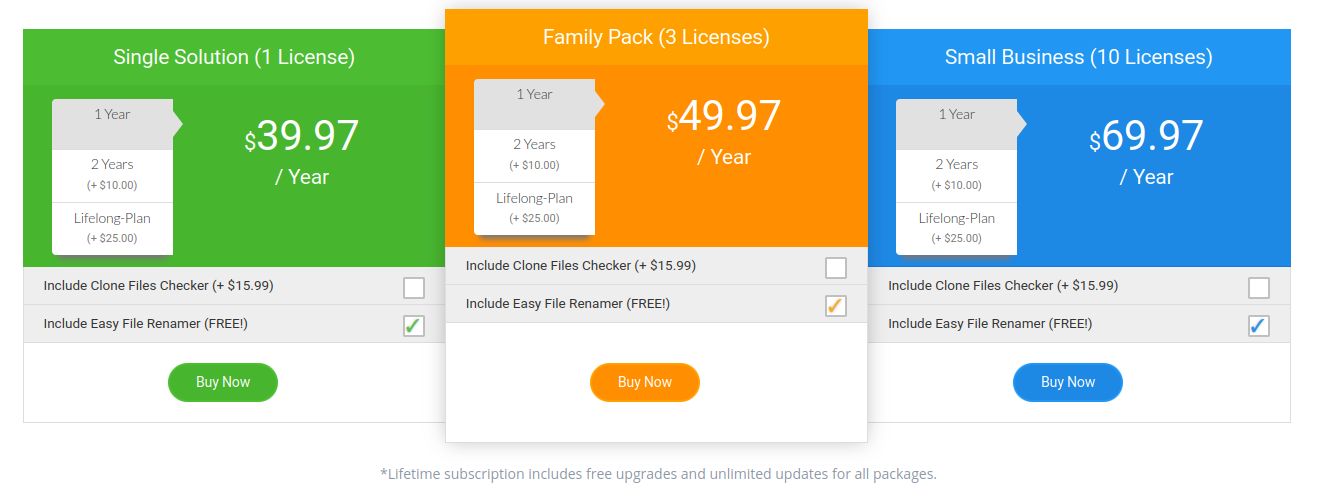
Pricing
As you might have heard, nothing good in life comes for free. In return for its intuitive service, PictureEcho requires a minimal fee. They have three different yearly plans that come with a free subscription to another useful tool called Easy File Renamer as well. The neat thing is that the charges are minimal and come with a 30 days money-back guarantee as well!
Using Lightroom itself might require you to watch tutorials but using PictureEcho is a piece of cake. All of this at a very affordable rate!